DPI helper
Laser DPI calculator
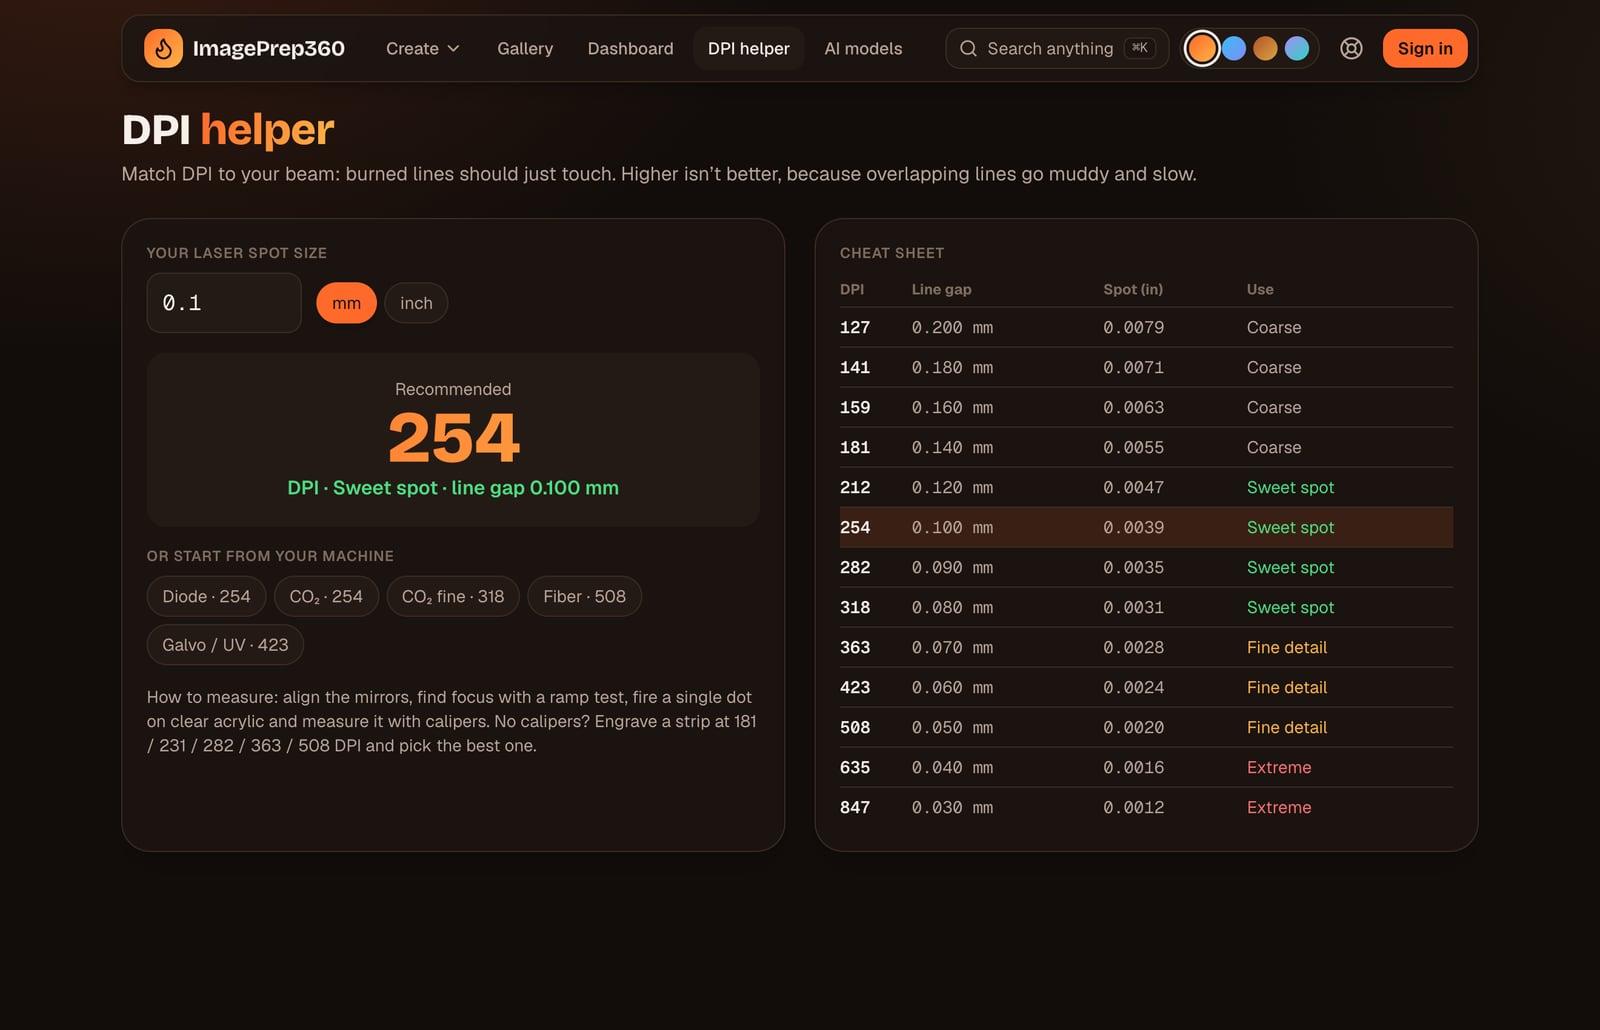
DPI should match your laser's spot size so that burned lines just touch. Type the spot size and get the DPI, the line gap, and the pixels your photo needs.
Laser DPI calculator
Enter your spot size or pick your machine. It uses the same formulas as the DPI helper in the app, and checks whether your photo has enough pixels for the size you want.
Or start from your machine
Recommended DPI
254
Pixels the file needs
1016 px
DPI cheat sheet
| DPI | Line gap | Spot (in) | Use |
|---|---|---|---|
| 127 | 0.200 mm | 0.0079 | Coarse |
| 141 | 0.180 mm | 0.0071 | Coarse |
| 159 | 0.160 mm | 0.0063 | Coarse |
| 181 | 0.140 mm | 0.0055 | Coarse |
| 212 | 0.120 mm | 0.0047 | Sweet spot |
| 254 | 0.100 mm | 0.0039 | Sweet spot |
| 282 | 0.090 mm | 0.0035 | Sweet spot |
| 318 | 0.080 mm | 0.0031 | Sweet spot |
| 363 | 0.070 mm | 0.0028 | Fine detail |
| 423 | 0.060 mm | 0.0024 | Fine detail |
| 508 | 0.050 mm | 0.0020 | Fine detail |
| 635 | 0.040 mm | 0.0016 | Extreme |
| 847 | 0.030 mm | 0.0012 | Extreme |
The formula
DPI means dots, or lines, per inch. An inch is 25.4 mm, so the gap between two engraved lines is 25.4 divided by the DPI. For the lines to just touch, that gap should equal your laser's spot size. Turn it around and you get the calculator: DPI = 25.4 ÷ spot size in mm.
A spot of 0.1 mm gives 254 DPI, a line gap of exactly 0.1 mm. That is why 254 DPI is a safe starting point for most diode and CO₂ lasers.
Starting points by laser type
If you do not know your spot size, start from the machine. These are the same defaults the app uses when you pick a laser type:
- Diode: 254 DPI. Most 5 to 20 W diode lasers have a spot of about 0.08 to 0.1 mm.
- CO₂ with a standard 2 in lens: 254 DPI. Try 318 DPI for extra detail.
- CO₂ fine (1.5 in lens or a well-tuned machine): 318 DPI.
- Fiber: 508 DPI. A tiny spot, best for metal such as stainless steel.
- Galvo / UV: 423 DPI, for high-detail galvo-head marking.
Too high or too low
Higher is not better. If the DPI is too high for your spot, the lines overlap: every spot gets burned twice, the engraving goes muddy and dark, and the job takes longer. If it is too low, gaps appear between the lines and you see stripes.
The app groups DPI into bands: under 200 is coarse, 200 to 330 is the sweet spot for most machines, 331 to 520 is fine detail, and above 520 is extreme. Some materials want a different value than the machine default. Glass does better at a lower DPI, around 200 to 250, because it chips, while a fiber laser on steel can go to 400 to 600.
How many pixels your photo needs
The file has one pixel per dot, so the pixels needed are the size in inches times the DPI. A 4 in coaster at 254 DPI needs 1016 × 1016 pixels. An 8 × 10 in plaque at 254 DPI needs 2032 × 2540. If your photo has fewer pixels, it gets scaled up and looks soft.
Easy Mode shows the output size in pixels next to the DPI field, and warns you when the photo is too small, for example: "Your photo is 512 px; a 4 in print at 254 DPI needs 1016 px. Upscale 2×?" See upscaling photos for laser engraving for what that does.
How to measure your spot
Align the mirrors and find focus with a ramp test first. Then fire a single dot on clear acrylic and measure it with calipers. No calipers? Engrave a strip of small patches at 181, 231, 282, 363 and 508 DPI with the same speed and power, and pick the one where the fill is even with no stripes and no muddy overlap. Use that DPI from then on, and check it again when you change the lens.
Step by step
Find your spot size
Measure a single dot with calipers, or start from your laser type if you do not know it.
Enter it in the calculator
Type the spot size in mm or inches. The calculator shows the DPI, the line gap and the band.
Check the photo has enough pixels
Enter the engraving width in inches. The pixels needed are width × DPI.
Run a test strip
Engrave small patches at a few DPI values around the result and pick the cleanest.
Use it in the app
Pick your laser type in One Click or Easy Mode and set the DPI field to your value. Save it in a recipe to reuse it.
Questions
Short, specific answers. Every material and tool is in the guides.
- What DPI should I use for laser engraving photos?
- Match it to your spot size: DPI = 25.4 ÷ spot in mm. For most diode and CO₂ lasers that is about 254 DPI. Fiber lasers can go much higher.
- Is a higher DPI always sharper?
- No. Once the line gap is smaller than the spot, lines overlap and the image goes muddy and slow. The best DPI is the one where lines just touch.
- What is the line interval or scan gap?
- It is the distance between engraved lines: 25.4 ÷ DPI in mm. 254 DPI is 0.1 mm. Some software asks for this instead of DPI.
- Why does glass use a lower DPI?
- Glass frosts and can chip. Fewer, wider spaced lines reduce chipping, so the glass guide suggests 200 to 250 DPI.
- My photo is too small for the size I want. What now?
- Print smaller, lower the DPI, or upscale the photo with an AI upscaler before preparing it. Easy Mode tells you how far short you are.
- Does the DPI end up in the file?
- Yes. PNG and BMP exports carry the DPI, and the LightBurn project sets the line interval from it, so the image opens at the right physical size.
Keep going
Start with your own photo.
One Click, Easy Mode and Batch run in your browser. Sign up free with an email link, no card.
Free account, email link, no card.